
What is JetBackup?
JetBackup is the tool inside cPanel that lets you restore your own backups. You do not need to open a support ticket and you do not need to wait for us. Everything is done from your own control panel.
Open cPanel and look for JetBackup in the Files section. The first screen is the dashboard, which shows recent backup activity and what is available to restore.
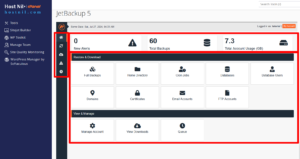
Which option should you use?
JetBackup gives you several sections. Choosing the right one saves a lot of trouble, because a full restore replaces everything, while the smaller options touch only what you select.
- Full Backups — the entire cPanel account at once: all websites, all databases, all email. Use this only when you want to put the whole account back to how it was on a certain date. It will overwrite newer work on every site in the account.
- Home Directory — individual files and folders. If only one website is broken, restore its folder from here instead of doing a full restore.
- Databases — restores one database. Remember that a WordPress site needs both its files and its database. Restoring only one of the two usually leaves the site broken.
- Database Users — the database users and their permissions. You rarely need this on its own.
- Domains — the domain settings of a site in the account.
- Email Accounts — mailboxes and the messages stored in them.
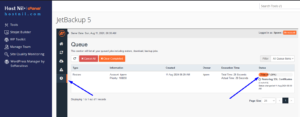
- Queue — backups live on a separate server, so every job has to be fetched first. The queue shows the progress and how much is left.
- Downloads — finished downloads appear here and are saved into your home directory. The Direct Download button on the right saves the file to your own computer. Files are named like
download_XXX_XXX.tar.gz.
Restore or Download?
Restore puts the files straight back onto your account, replacing what is there now. Download gives you a copy of the backup without changing anything live, which is the safer choice when you are not completely sure. In both cases you can remove items from your selection first using Remove items under each category.
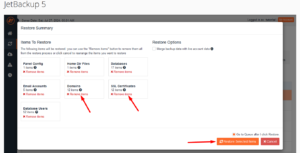
How to restore a full account backup
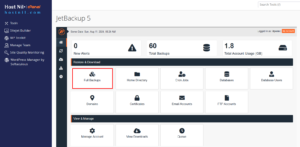
Step 1. Open cPanel > JetBackup and click Full Backups.
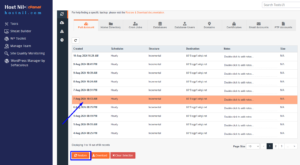
Step 2. You will see a list of backups by date and time. Pick the date from before the problem started, then click Restore.
Step 3. A summary window opens showing exactly what will be restored. Read it, then click Restore Selected Items.
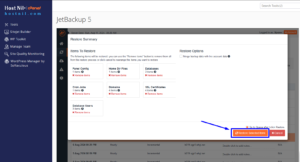
Step 4. The job is added to the queue and starts shortly. Open Queue to watch the progress. You can close the browser; the job keeps running on the server.
How to restore just one website
If only one site out of several is broken, a full restore is the wrong tool. Do this instead:
- Open Home Directory, pick the backup date, and select only that site’s folder — usually
public_html/yourdomain.com. - Open Databases, pick the same date, and select that site’s database.
- Restore both. Files without the database, or the database without the files, will usually leave the site broken.
Before you restore — please read
- A restore overwrites what is there now. Anything added after the backup date is lost. If your site has orders, comments or new posts since then, they will disappear.
- If you are unsure, download first. Download the backup, look inside it, and only then decide whether to restore.
- It is not instant. The backup has to be pulled from another server first, so a large account can take a while.
- Not sure which date to pick? Open a support ticket before restoring. Choosing the right backup is much easier than undoing a wrong restore.
If anything goes wrong, contact us and we will help you through it.
JetBackup কী?
JetBackup হলো cPanel-এর ভেতরের একটা টুল, যা দিয়ে আপনি নিজেই ব্যাকআপ রিস্টোর করতে পারবেন। সাপোর্ট টিকিট খুলতে হবে না, আমাদের জন্য অপেক্ষাও করতে হবে না।
cPanel-এ লগইন করে Files সেকশনে JetBackup খুঁজুন। প্রথম পাতাটা হলো ড্যাশবোর্ড, যেখানে সাম্প্রতিক ব্যাকআপের অবস্থা দেখা যায়।
কোন অপশনটি ব্যবহার করবেন?
সঠিক অপশন বেছে নেওয়া খুব জরুরি। Full Backup সবকিছু বদলে দেয়, আর ছোট অপশনগুলো শুধু যা বেছে নেবেন তাই বদলায়।
- Full Backups — পুরো cPanel অ্যাকাউন্ট একসাথে: সব ওয়েবসাইট, সব ডাটাবেজ, সব ইমেইল। শুধু তখনই ব্যবহার করবেন যখন পুরো অ্যাকাউন্টকে নির্দিষ্ট একটা তারিখের অবস্থায় ফিরিয়ে নিতে চান।
- Home Directory — আলাদা ফাইল বা ফোল্ডার। একটামাত্র সাইট নষ্ট হলে শুধু সেই সাইটের ফোল্ডার রিস্টোর করুন।
- Databases — একটি ডাটাবেজ রিস্টোর করে। মনে রাখবেন, WordPress সাইটের জন্য ফাইল আর ডাটাবেজ দুটোই লাগে। যেকোনো একটি রিস্টোর করলে সাধারণত সাইট কাজ করে না।
- Database Users — ডাটাবেজ ইউজার ও তাদের অনুমতি।
- Domains — অ্যাকাউন্টের ডোমেইন সেটিংস।
- Email Accounts — ইমেইল অ্যাকাউন্ট ও মেসেজ।
- Queue — ব্যাকআপ আলাদা সার্ভারে থাকে, তাই আগে আনতে হয়। এখানে কাজের অগ্রগতি দেখা যায়।
- Downloads — ডাউনলোড শেষ হলে ফাইল এখানে আসে। ডান পাশের Direct Download বাটনে চাপলে নিজের কম্পিউটারে নামবে।
Restore নাকি Download?
Restore ফাইলগুলো সরাসরি অ্যাকাউন্টে বসিয়ে দেয় এবং এখন যা আছে তা মুছে ফেলে। Download শুধু একটা কপি দেয়, লাইভ সাইটে কিছু বদলায় না — নিশ্চিত না হলে এটাই নিরাপদ।
পুরো অ্যাকাউন্ট রিস্টোর করার নিয়ম
ধাপ ১। cPanel থেকে JetBackup খুলে Full Backups-এ ক্লিক করুন।
ধাপ ২। তারিখ ও সময় অনুযায়ী ব্যাকআপের তালিকা দেখবেন। সমস্যা শুরু হওয়ার আগের তারিখটি বেছে Restore-এ চাপ দিন।
ধাপ ৩। একটা সামারি উইন্ডো খুলবে, যেখানে কী কী রিস্টোর হবে দেখানো থাকবে। পড়ে নিয়ে Restore Selected Items-এ চাপ দিন।
ধাপ ৪। কাজটি Queue-তে যুক্ত হয়ে শুরু হবে। Queue অপশনে অগ্রগতি দেখতে পারবেন। ব্রাউজার বন্ধ করলেও কাজ সার্ভারে চলতে থাকবে।
শুধু একটি ওয়েবসাইট রিস্টোর করার নিয়ম
কয়েকটা সাইটের মধ্যে যদি একটা নষ্ট হয়, তাহলে Full Backup করবেন না। এভাবে করুন:
- Home Directory খুলে তারিখ বেছে শুধু সেই সাইটের ফোল্ডার সিলেক্ট করুন — সাধারণত
public_html/yourdomain.com। - Databases খুলে একই তারিখ বেছে সেই সাইটের ডাটাবেজ সিলেক্ট করুন।
- দুটোই রিস্টোর করুন। শুধু ফাইল বা শুধু ডাটাবেজ রিস্টোর করলে সাইট কাজ করবে না।
রিস্টোর করার আগে অবশ্যই পড়ুন
- রিস্টোর করলে এখনকার ডাটা মুছে যাবে। ব্যাকআপের তারিখের পরে যা যোগ হয়েছে — নতুন অর্ডার, কমেন্ট, পোস্ট — সব চলে যাবে।
- নিশ্চিত না হলে আগে ডাউনলোড করুন। ব্যাকআপ নামিয়ে দেখে নিন, তারপর সিদ্ধান্ত নিন।
- সাথে সাথে হয় না। আলাদা সার্ভার থেকে ফাইল আনতে হয়, তাই বড় অ্যাকাউন্টে সময় লাগতে পারে।
- কোন তারিখ নেবেন বুঝতে পারছেন না? রিস্টোর করার আগে সাপোর্ট টিকিট খুলুন। সঠিক ব্যাকআপ বেছে নেওয়া সহজ, কিন্তু ভুল রিস্টোর ফেরানো কঠিন।
কোনো সমস্যা হলে আমাদের সাথে যোগাযোগ করুন, আমরা সাহায্য করব।